Create a Highly Available Kubernetes Cluster From Scratch
In this guide we’re looking to create a highly available Kubernetes cluster with multiple control plane nodes, loadbalancers and worker nodes.
The architecture of this Kubernetes cluster ensures a good level of availability and reliability for use in a production environment, but it is by no means fail-safe.
I’ve followed the recommendations from Kubernetes documentations which you can find here. All I’ve done is to present them in a curated manner.
What you’ll need
- 3 Virtual machines for master nodes running Debian or CentOS with at least 2 GB of RAM and 2 CPU cores
- 2 worker nodes running Debian or CentOs. It can be either VM’s or bare-metal servers. Use full bare metal servers if you have heavy workloads
- At least 2 virtual machines running Debian or CentOs for load balancing
Architecture
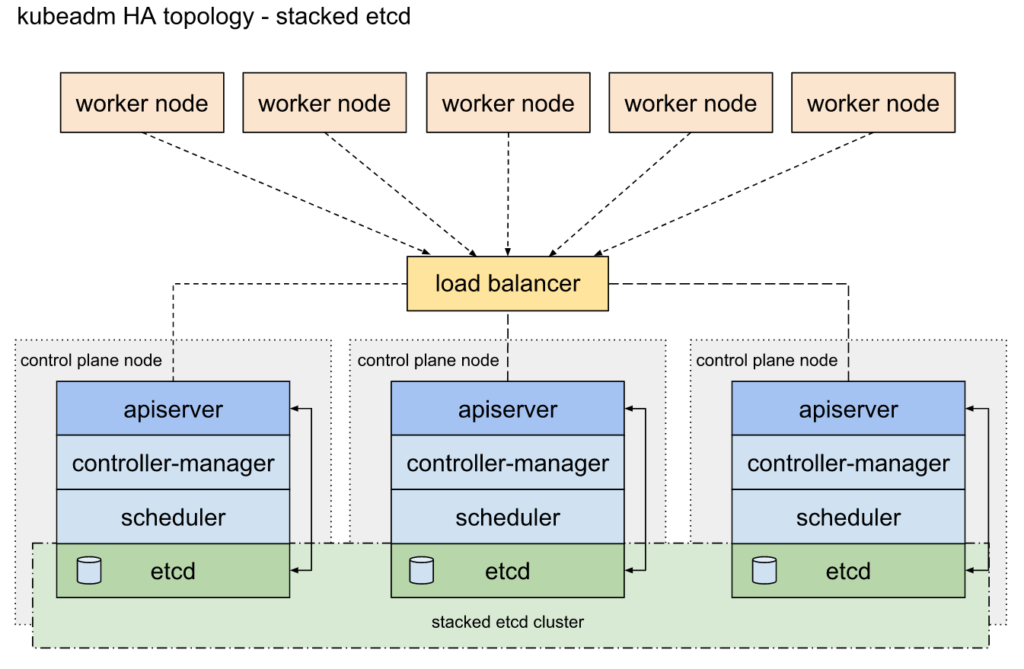
- 3 separate master nodes (control planes) for redundancy
- the master nodes are connected via loadbalancer
- we’ll have at least 2 load balancing instance where they negotiate a virtual IP between the instances
- worker nodes connect to the loadbalancer and the loadbalancer distributes request between control plane nodes
Setting up the Load balancers
We’ll be using HA proxy and Keepalived for the load balancing solution. I’ve followed this guide for reference.
- Install HAProxy and Keepalived on both load balancing server
apt install haproxy
apt install keepalived
- Edit /etc/keepalived/keepalived.conf and make the configurations
! /etc/keepalived/keepalived.conf
! Configuration File for keepalived
global_defs {
    router_id LVS_DEVEL
}

vrrp_script check_apiserver {
  script "/etc/keepalived/check_apiserver.sh"
  interval 3
  weight -2
  fall 10
  rise 2
}

vrrp_instance VI_1 {
    state ${STATE}
    interface ${INTERFACE}
    virtual_router_id ${ROUTER_ID}
    priority ${PRIORITY}
    authentication {
        auth_type PASS
        auth_pass ${AUTH_PASS}
    }

    virtual_ipaddress {
        ${APISERVER_VIP}
    }

    track_script {
        check_apiserver
    }

}
- Add the script for health checking
/etc/keepalived/check_apiserver.sh
#!/bin/sh
errorExit() {
    echo "*** $*" 1>&2
    exit 1
}

curl --silent --max-time 2 --insecure https://localhost:${APISERVER_DEST_PORT}/ -o /dev/null || errorExit "Error GET https://localhost:${APISERVER_DEST_PORT}/"

if ip addr | grep -q ${APISERVER_VIP}; then

    curl --silent --max-time 2 --insecure https://${APISERVER_VIP}:${APISERVER_DEST_PORT}/ -o /dev/null || errorExit "Error GET https://${APISERVER_VIP}:${APISERVER_DEST_PORT}/"

fi
- Edit
/etc/haproxy/haproxy.cfgand make the configurations based on the guide
# /etc/haproxy/haproxy.cfg
#---------------------------------------------------------------------
# Global settings
#---------------------------------------------------------------------
global
    log /dev/log local0
    log /dev/log local1 notice
    daemon
#---------------------------------------------------------------------
# common defaults that all the 'listen' and 'backend' sections will
# use if not designated in their block
#---------------------------------------------------------------------
defaults
    mode                    http
    log                     global
    option                  httplog
    option                  dontlognull
    option http-server-close
    option forwardfor       except 127.0.0.0/8
    option                  redispatch
    retries                 1
    timeout http-request    10s
    timeout queue           20s
    timeout connect         5s
    timeout client          20s
    timeout server          20s
    timeout http-keep-alive 10s
    timeout check           10s
#---------------------------------------------------------------------
# apiserver frontend which proxys to the control plane nodes
#---------------------------------------------------------------------
frontend apiserver
    bind *:${APISERVER_DEST_PORT}
    mode tcp
    option tcplog
    default_backend apiserver
#---------------------------------------------------------------------
# round robin balancing for apiserver
#---------------------------------------------------------------------
backend apiserver
    option httpchk GET /healthz
    http-check expect status 200
    mode tcp
    option ssl-hello-chk
    balance     roundrobin
        server ${HOST1_ID} ${HOST1_ADDRESS}:${APISERVER_SRC_PORT} check
- The configuration on both servers can be identical except two parts in the keepalived configuration:
state MASTER
state BACKUP
The MASTER state should be on the main load balancer node and the BACKUP state should be used on all others. You can have many BACKUP nodes with the same state.
priority ${PRIORITY}
Should be LOWER on the MASTER server. For example you can configure priority 100 on the MASTER server, priority 101 on the first BACKUP server, priority 102 on the second BACKUP server and so on.
option httpchk GET /healthz
This option should probably be changed to /livez. Check your kube-apiserver configuration file and match it to this value.
- Once the configuration on both servers is done restart the services
service haproxy restart
service keepalived restart
Setting up master nodes
First master node (main control plane)
IMPORTANT NOTE:
On Debian machines, you need to edit /etc/default/grub and set systemd.unified_cgroup_hierarchy=0 as the value for GRUB_CMDLINE_LINUX_DEFAULT as so:
GRUB_CMDLINE_LINUX_DEFAULT="systemd.unified_cgroup_hierarchy=0"
Then update grub:
update-grub
and reboot the server.
-
yum updateORapt update&& apt upgrade -
Disable SElinux (for CentOS)
nano  /etc/selinux/config
.
.
.
SELINUX=disabled
- Letting iptables see bridged traffic
cat <<EOF > /etc/sysctl.d/k8s.conf
net.bridge.bridge-nf-call-ip6tables = 1
net.bridge.bridge-nf-call-iptables = 1
EOF
sysctl --system
- Set all hostnames in
/etc/hostsif you’re not using a DNS serve - Turn off swap
swapoff -a
- Open /etc/fstab and comment out the section related to swap
- Install Docker
- Install kubeadm
- Open ports with firewalld
sudo firewall-cmd --zone=public --permanent --add-port=6443/tcp
sudo firewall-cmd --zone=public --permanent --add-port=2379-2381/tcp
sudo firewall-cmd --zone=public --permanent --add-port=10250/tcp
sudo firewall-cmd --zone=public --permanent --add-port=10257/tcp
sudo firewall-cmd --reload
- Configure native cgroups driver
cat > /etc/docker/daemon.json <<EOF{
  "exec-opts": ["native.cgroupdriver=systemd"],
  "log-driver": "json-file",
  "log-opts": {
    "max-size": "100m"
  },
  "storage-driver": "overlay2",
  "storage-opts": [
    "overlay2.override_kernel_check=true"
  ]
}
EOF
- Then apply the changes
systemctl daemon-reload
systemctl restart docker
- Pull kubeadm images
kubeadm config images pull --kubernetes-version v1.24.0
You can specify the desired version with –kubernetes-version. It’s recommended for all nodes to have the same version so it’s better to manually pull the same version on each master node as to avoid confusion.
- After successfully pulling the images, initialize the master node via this command:
kubeadm init --apiserver-advertise-address=CLUSTER-ENDPOINT --control-plane-endpoint=cluster-endpoint --pod-network-cidr=10.244.0.0/16 --upload-certs --kubernetes-version v1.24.0
CLUSTER-ENDPOINT should point to the virtual IP of the loadbalancer. You can define it in /etc/hosts if you’re not using a DNS server.
- Apply flannel for cluster networking
kubectl apply -f https://raw.githubusercontent.com/flannel-io/flannel/master/Documentation/kube-flannel.yml
- Check the status of pods via:
kubectl get pods -A
Everything should be running normally.
- Save the output from the kubeadm init command so it can be used for starting other master and worker nodes
Second and Third Master nodes
- Follow all of the steps mentioned in the previous section and pull the kubeadm images with:
kubeadm config images pull --kubernetes-version v1.24.0
- Join the second and third master nodes to the cluster via the output from the first master node.
Kubectl join …
Adding worker nodes to the cluster
- Login to your worker node(s)
- Follow the same steps from the master node installation and pull the kubeadm images with:
kubeadm config images pull --kubernetes-version v1.24.0
- Open the following ports with iptables or other firewall
iptables -A INPUT -p tcp --dport 10250 -j ACCEPT
iptables -A INPUT -p tcp --dport 30000:35000 -j ACCEPT
iptables -A INPUT -p tcp --dport 10248 -j ACCEPT
iptables-save > /etc/iptables/rules.v4
-
Make sure DNS names are configured in
/etc/hostsand the nameservers are set in/etc/resolv.conf -
Use kubeadm join command with the token acquired from the first master node to join the server into the cluster
-
Finally, log into one of your master node (control plane) and run the following command to see all the joined nodes:
kubectl get nodes -A
You should see an output of all your nodes. (master + worker nodes)
Hopefully this article helped you in learning how to create a highly available Kubernetes cluster.
Resources
- Create a highly available Kubernetes cluster
- Creating clusters with kubeadm
- Installing kubeadm
- kubelet configuration
- Issues with coreDNS
- edit KUBELET_NETWORK_ARGS
- Disable selinux
- Disable GPG checking
- Define cgroups driver systemd
- kube-schedular fails on debain